How to Automatically File Emails in Outlook: 4 Methods (2026)
Outlook Rules, Quick Steps, AI-powered filing, and VBA macros — compared step by step so you can pick the right approach and stop filing manually.
To automatically file emails in Outlook, the fastest built-in method is to right-click an email and choose Rules → Always Move Messages From [sender], then pick a folder — every future email from that sender files itself. For emails that don't follow a fixed pattern (new senders, mixed topics), an AI add-in like Folder Suggest reads each message and suggests the right folder with one click, no rules to maintain.
If you want to automatically file emails in Outlook, there are four practical ways to do it, each with different trade-offs in setup effort, flexibility, and maintenance. Manual filing eats hours every week: a McKinsey study found knowledge workers spend 28% of their day managing email, and a meaningful chunk of that is simply deciding which folder each message belongs in.
This guide covers every method available for Outlook automatic filing — from the built-in Rules engine to AI-powered suggestions, with step-by-step instructions, honest pros and cons, and a comparison table to help you decide. Whether you need to auto file emails from a specific sender or want a system that handles everything without configuration, one of these methods will fit.
Quick Comparison: 4 Ways to File Emails Automatically
| Method | Setup time | Works for new senders? | Free? | Best for |
|---|---|---|---|---|
| Outlook Rules | 5–15 min per rule | ✗ No — needs a rule per pattern | ✓ Yes | Predictable, repetitive email (newsletters, alerts) |
| Quick Steps & Categories | 2–5 min | ✓ Yes (manual trigger) | ✓ Yes | Small set of folders, keyboard-driven workflows |
| Folder Suggest (AI) | 2 min install | ✓ Yes — reads content, not rules | ✓ Yes | Complex folder structures, varied senders, zero maintenance |
| VBA Macros | 30+ min (coding) | Depends on logic | ✓ Yes | Developers who want full programmatic control |
Method 1: Outlook Rules (Built-in, Manual Setup)
Outlook Rules are the most powerful built-in tool for automatic email filing. You define conditions — the sender's address, words in the subject line, whether you were CC'd — and Outlook moves matching emails to the folder you specify without any manual action.
Rules are ideal for predictable, repetitive patterns: newsletters, system notifications, and emails from a specific team or client domain that always belong in the same place.
How to set up a rule (all Outlook versions)
Classic Outlook for Windows:
- Right-click an email in your inbox and choose Rules > Create Rule.
- Check the conditions you want to match (sender, subject keywords, etc.).
- Check Move the item to folder, click Select Folder, and choose the destination.
- Click OK. Outlook asks whether to run the rule on existing inbox messages.
For more complex rules with multiple conditions or exceptions, go to Home > Rules > Manage Rules & Alerts > New Rule to open the full Rules Wizard.
New Outlook for Windows & Outlook on the web:
- Click the Settings gear (top right) and go to Mail > Rules.
- Click Add new rule and give it a name.
- Set a condition — for example, From contains a specific address.
- Under Add an action, choose Move to and select the destination folder.
- Optionally tick Stop processing more rules.
- Click Save.
Pros
- Fully automatic — emails are filed without any intervention once the rule is active.
- Built-in — no add-ins or external tools required.
- Flexible conditions — sender, subject, CC, importance, size, and more.
Cons
- Doesn't scale. Each new sender or pattern means another rule. Power users often accumulate 50–100+ rules that conflict and are tedious to debug.
- Breaks silently. When a client changes their email address or a project gets renamed, rules stop matching — and you may not notice for days.
- No help with new senders. First emails from unknown contacts won't match any existing rule.
- Classic Outlook has a 256 KB rule storage cap — a hard limit that forces you to delete old rules.
For a deeper comparison of Rules vs AI-based filing, see Outlook Rules vs Folder Suggest.
Method 2: Quick Steps and Categories
Quick Steps are one-click shortcuts that apply a set of actions to whichever email is currently selected. Unlike Rules, they don't run automatically — you trigger them manually. That makes them useful when you want to review an email before filing it.
Setting up a Quick Step for filing
- In Classic Outlook, find the Quick Steps group on the Home tab.
- Click New Quick Step > Move to Folder.
- Name it (e.g. "File: Finance") and select the destination folder.
- Optionally assign a keyboard shortcut — Ctrl+Shift+1 through Ctrl+Shift+9.
- Click Finish.
Now, with any email selected, one click (or one keystroke) moves it to that folder instantly.
Using Categories as a filing complement
Categories tag emails without moving them — useful when you want the same email accessible from multiple "views." Right-click any email and choose Categorize > [colour/name]. Combine categories with Search Folders to create virtual views that automatically show all emails with a given tag, regardless of which folder they're physically in.
Pros
- Fast to set up — one Quick Step per folder, done in under a minute.
- Keyboard shortcuts make filing as fast as pressing Ctrl+Shift+1.
- Works for any email — new senders, ambiguous topics, sent mail.
Cons
- Not automatic — you still have to trigger each filing action manually.
- Quick Steps are Classic Outlook only — not available in New Outlook or Outlook on the web (as of 2026).
- Doesn't scale well past 9 folders (limited keyboard shortcuts).
Method 3: AI-Powered Filing with Folder Suggest
Rules are pattern-matching: fixed conditions mapped to fixed actions. AI takes a different approach. Instead of conditions you define in advance, it reads each email the way you would — considering the sender, subject, body content, and your filing history — and suggests the folder that fits best.
Folder Suggest is a free Outlook add-in that analyses the email you're reading and ranks your existing folders by relevance. There are no rules to write, no conditions to maintain, and no training required. It works from the first email you open, for any sender, against whatever folder structure you already have.
How it works
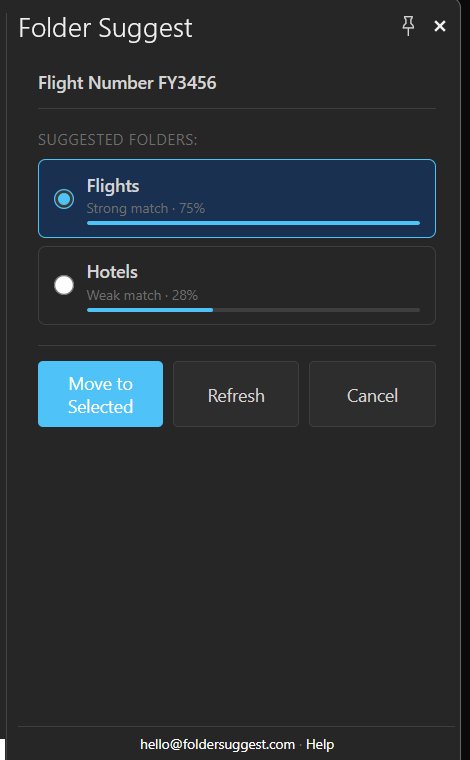
Open any email and open the Folder Suggest pane. The add-in uses semantic matching to compare the email's content against messages already filed in your folders. The best matches appear as a ranked list with confidence scores. Click the top suggestion to file the email — or pick a different folder from the list.
The AI model runs entirely on your device — your email content never leaves your machine. No cloud service, no external server, no account required. A lightweight model (~20 MB) downloads once and caches locally; every subsequent suggestion takes a second or two.
What makes it different from rules
- No setup required. Install it and it works immediately — no configuration, no rules to write. It learns from the emails already in your folders.
- Handles new senders and new topics. Because it reads email content rather than matching fixed conditions, a first email from a new contact is handled just as well as a familiar one.
- Works for sent mail too. Open any email — including messages in your Sent Items — and get a filing suggestion.
- No maintenance. When you add a new folder or restructure your hierarchy, Folder Suggest adapts automatically. Nothing to update.
- Privacy-first. The AI runs locally. Your email content never touches an external server.
Pros
- Zero configuration — works immediately on install.
- Handles every email — no gaps for new senders or ambiguous topics.
- No rule maintenance — adapts as your folders change.
- On-device privacy — nothing leaves your machine.
- Free — no subscription, no premium tier.
Cons
- Not fully automatic — you confirm each suggestion with a click (by design, so emails are never silently misfiled).
- Requires the add-in pane open — you trigger it per email rather than it running in the background.
Stop writing rules that break. File emails in seconds with AI that learns from your folder structure.
Install Folder Suggest free →Method 4: VBA Macros (Advanced, Not Recommended)
For developers comfortable with Visual Basic for Applications, Outlook's VBA editor allows you to write custom filing logic that runs when new mail arrives. This gives you full programmatic control but comes with significant downsides for most users.
Example: auto-file by sender domain
Pros
- Full programmatic control — you can implement any logic, including calling external APIs.
- Can combine multiple data sources — check a CRM, database, or spreadsheet before filing.
Cons
- Classic Outlook for Windows only — VBA doesn't work in New Outlook, Outlook on the web, or Mac.
- Security restrictions. Most organisations disable VBA macros via Group Policy. You'll need macro security set to "Notifications" or lower.
- Fragile. VBA code breaks if folders are renamed, moved, or deleted. No built-in error handling for edge cases.
- No support or updates. Microsoft has signalled VBA in Outlook is deprecated in favour of Office Add-ins (JavaScript-based).
- Hard to maintain. If you leave the role, the next person inherits undocumented code.
VBA macros are only worth considering if you have very specific filing logic that can't be expressed as Rules and you're willing to maintain the code indefinitely. For everyone else, one of the first three methods is a better fit.
Which Method Should You Use?
There's no single right answer. The best approach to file emails automatically in Outlook depends on your inbox and how much variety it contains.
Use Rules for genuinely predictable email: newsletters, automated system alerts, emails from a fixed sender that always belong in the same folder. Rules are free, built-in, and fully automatic for these patterns.
Use Quick Steps if you file to a handful of folders repeatedly and prefer a keyboard-driven workflow. The shortcuts make it fast without any rule maintenance.
Use Folder Suggest for everything that doesn't fit a pattern — emails from new senders, ambiguous topics, complex folder structures, or any inbox where rules have proven too brittle. It works alongside existing rules: let rules handle the predictable traffic, and use Folder Suggest for the rest.
Use VBA only if you need fully custom programmatic logic and are comfortable maintaining code that only runs in Classic Outlook for Windows.
Most people get the best results by combining Outlook Rules (for the predictable 60%) with Folder Suggest (for everything else). This gives you Outlook automatic filing where it's reliable, plus AI-powered suggestions for the messages that rules can't handle.
How to Automatically Send Emails to a Folder in Outlook
This is the most common question people search for, and the answer depends on what triggers the filing:
If you want all emails from a specific sender to go to a folder automatically:
- Right-click an email from that sender in your inbox.
- Choose Rules > Always Move Messages From [sender].
- Select the destination folder and click OK.
This creates a simple rule behind the scenes. All future emails from that sender are automatically sent to the folder you chose.
If you want emails with specific subject keywords to go to a folder:
- Go to Settings > Mail > Rules > Add new rule.
- Set the condition to Subject contains and enter your keywords.
- Set the action to Move to and select the folder.
- Save the rule.
If you want emails to be sent to the right folder automatically without writing rules: install Folder Suggest. It analyses each email's content and suggests the correct folder — no conditions to define, no rules to maintain. You confirm the suggestion with one click.
Frequently Asked Questions
How do I automatically send emails to a folder in Outlook?
The fastest way is to right-click an email, choose Rules > Always Move Messages From [sender], and select a folder. This creates a rule that automatically sends all future emails from that sender to your chosen folder. For subject-based filing, create a rule via Settings > Mail > Rules with a "Subject contains" condition. For filing without rules, use an AI add-in like Folder Suggest that matches emails to folders based on content.
Can Outlook auto-file emails based on sender?
Yes. Create an Outlook Rule with the condition "From" set to the sender's address, and the action "Move to" pointing to your chosen folder. The quickest method: right-click any email from that sender and choose Rules > Always Move Messages From [sender]. All future emails from that address will be filed automatically. Note that this only works for senders you've already set up — emails from new contacts won't be covered until you create another rule.
What's the best way to file emails in Outlook?
For predictable emails (newsletters, system alerts, specific senders), Outlook Rules work well and are fully automatic. For everything else — new senders, ambiguous topics, complex folder structures — an AI-powered tool like Folder Suggest handles filing without requiring you to write or maintain rules. Most people get the best results by combining both: rules for predictable traffic, AI suggestions for everything else.
Does Outlook have automatic filing built in?
Outlook has Rules (condition-based automation that moves emails matching specific criteria) and Quick Steps (one-click manual filing shortcuts). These handle predictable patterns well but require setup for each sender or condition, and they can't handle emails from new contacts or ambiguous topics. For true automatic filing that works without pre-defined conditions, you need an add-in like Folder Suggest that uses AI to match emails to folders based on content rather than rules.
Folder Suggest is free and installs in about 2 minutes. No rules to write, no configuration, no maintenance.
Install Folder Suggest free →